


Nothing can make you feel more vibrant than a red manicure: The bold hue makes a standout statement, it can be both chic and playful and the color can help exude confidence. “Red nails give a powerful, yet sexy message,” says celebrity nail artist Vanessa McCullough who has worked with stars like Jennifer Coolidge and Christina Applegate. Best yet, although red nails have been a staple for women for decades, red nail designs are one of the hottest nail trends now. That’s why we’ve rounded up our favorite nail looks using the fiery color that you can DIY at home or bring to the salon for inspiration.
What is the best shade of red for my skin tone?
The best way to wear red nail designs is to factor in skin tone when picking a red polish to use.
Fair skin? Try a pinkish red such as essie Nail Color Polish in Style Hunter. “That hint of bluish pink really complements delicate, fair skin!” says celebrity makeup artist Mally Roncal.
Medium or olive skin? Try a brick red polish such as CND Vinylux Polish in Oxblood. “Reds with a hint of brown or gold blend well with the natural warmth of your skin tone,” says Roncal.
Dark skin? Try a red wine polish such as Sally Hansen Insta-Dri Polish in Cinna-Snap, says Roncal. “To really brighten a deep skin tone, you need a richly pigmented shade like wine.” (Click through here to learn more about your skin’s tone and undertone.)
Also smart: “As women age and lose elasticity in our skin, it shows in our hands. A red nail design nail with some length polished with a classic red will elongate the fingers and keep them looking feminine,” assures McCullough. “Keeping nails manicured with a darker color also helps camouflage any ridging of the nails, thickening of the cuticles or dryness.”
12 radiant DIY red nail designs
Of course, you can stick to a tried-and-true red mani if you’re looking for a more classic and traditional red nail look. However, if you’re wanting to spice it up and incorporate some fun nail designs, we’ve found 12 fabulous looks you can easily recreate at home.
1. Red nail designs: Red chrome nails
Chrome has been one of the biggest nail trends of 2024, and we’re all for it. The best part? Chrome can be applied to just about any color — including red. These gorgeous red chrome nails have the most beautiful pearlescent finish that complements the red beautifully.
Watch the video below by @MarlaKris on YouTube to learn how to do chrome nails without gel.
Get the look:
- Paint all nails two coats of red polish, like essie Nail Lacquer in Not Red-y for Bed.
- Paint all nails with a coat of clear polish and let get tacky. Then, use an eyeshadow sponge and “rub” on chrome powder, like Manicurist Paris Pink Glazed Effect Powder, to get the chrome, pearlescent effect.
- Wipe the excess powder off with a brush.
- Seal with top coat.
2. Red nail designs: Red French tips
A French manicure never goes out of style, but it can be done in many different variations. Spice it up with red French tips, a fun twist on the classic mani.
Get the look:
- Paint all nails two coats of a nude-pink polish, like Olive & June Nail Polish in The Queen Takes Her Tea With Milk; Let dry.
- Use a red nail striper, like FingerPaints Striping Polish in Red-Aissance, to paint on thin, crescent shapes at the tip of the nails for the French tips; Let dry.
- Seal with top coat.
3. Red nail designs: Ravishing red roses
A red rose has to be one of the the most romantic designs, and this beautiful bloom is super fun to create!
Get the look:
- Apply two coats of nude-pink polish, such as Olive & June Nail Polish in The Queen Takes Her Tea With Milk to all nails; Let dry.
- On the pointer and ring fingernails, use a green nail art polish, like FingerPaints Striping Polish in Green to make a long, curved line with leaves. Then, make a bud shape using a red nail art polish, like L.A. Colors Art Deco Nail Polish in Red.
- On the pinky nails, use the green nail art polish to make leaves and stems.
- Finish with top coat.
4. Red nail designs: Fabulous swirl nail art
Abstract nail art is so fun, and better yet, super easy to recreate since there really are no rules. Just paint on some fun stripes and swirls, and you’re set!
Get the look:
- Apply two coats of red polish, like Sally Hansen Insta-Dri Nail Color in That’s A-Blazing, to the middle and ring fingernails, and apply two coats of a nude-pink polish like Olive & June Nail Polish in The Queen Takes Her Tea With Milk to the remaining nails; Let dry.
- Use a striping brush and the red polish to paint on one thin, curvy, vertical stripe anywhere on each of the nude nails. Then, use the striping brush and white nail polish to create a similar stripe next to the red stripe. Let dry completely.
- Finish with top coat.
5. Elegant red tulips
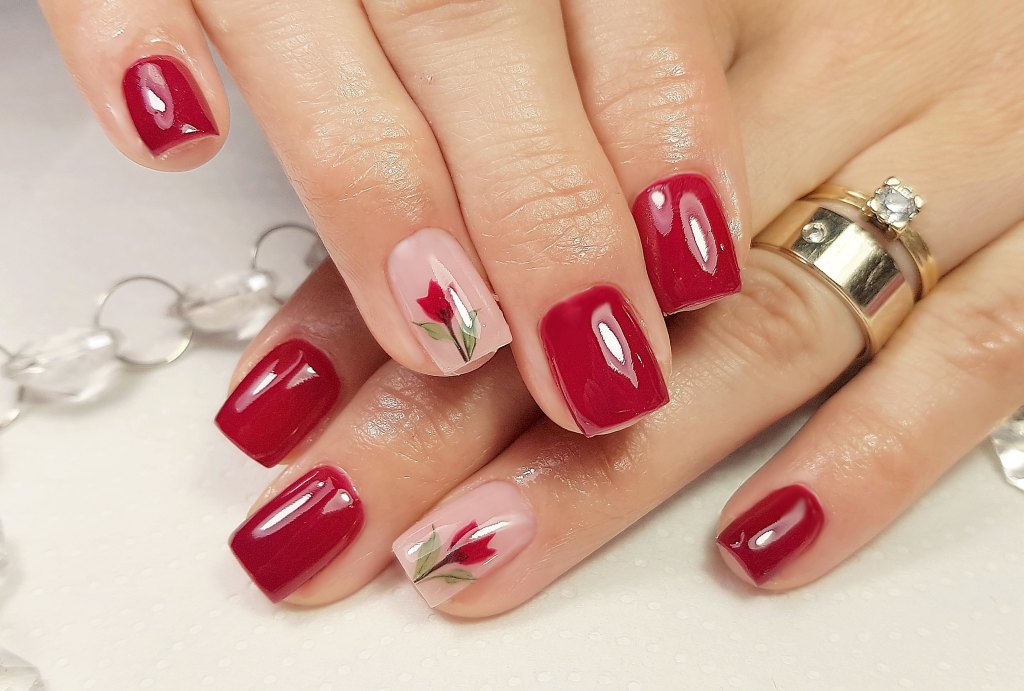
A flirty floral red nail design looks gorgeous any time of year. This manicure features a slightly deeper red, but you can substitute in the best red for you.
Get the look:
- Prep nails with a base coat. Let dry.
- Coat each nail but the ring finger nails with two layers of a scarlet red polish, like Sally Hansen Insta-Dri Polish in That’s a Blazing!. On the ring fingernails, paint two coats of a sheer, off-white polish, like Cirque Colors Sheers Nail Polish in Linen. Let dry.
- To create the tulip, dip a striping brush into a brown polish, like Nails.Inc nail polish in Copacabana Beach Nude, and use it to draw the stem of the flower starting at the tip of the nail and stopping slightly before the center of the nail. Then, dip the striping brush into the scarlet polish and use to create a tulip shape with three points or “petals.” The tips of the petals should be in the center of the nail. For the leaves, dip a striping brush into a green polish, like Olive & June polish in WKF, and use to create two curved leaf shapes on each side of the stem. let dry.
- Finish with top coat.
6. Red nail designs: Cute red cherries
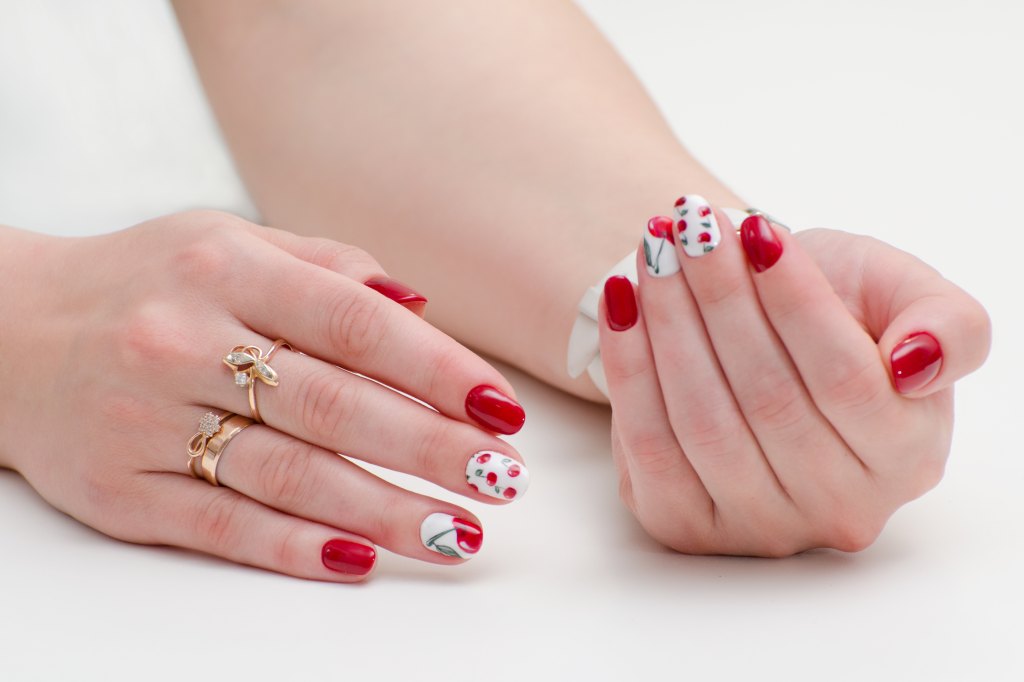
Cherries are one of the trendiest designs of the year in clothing, accessories and, you guessed it, nails! The best part? They are easier to recreate than you may think.
Get the look:
- Prep nails with a base coat. Let dry.
- Paint the thumb, pointer and pinky nails with two coats of a red polish, like Salon Perfect Nail Polish in Salsa Dance. Let dry.
- On the middle and ring finger nails, paint two coats of a white polish, like Sally Hansen Xtreme Wear Nail Polish in White On. Let dry.
- Dip a dotting tool, like Le Mini Macaron Le Dottie, into the red polish then use it to create 3-4 small cherries on the middle finger nail and one larger cherry on the corner of the ring finger nail. Let dry.
- Using a green nail art striper, like FingerPaints Striping Polish in Green, create stems by painting a thin line stemming from each cherry with a small leaf attached. Let dry.
- Finish with top coat.
7. Dark red nails: Cherry cola nails
This simple and elegant look by @MariaLouise_nails on Instagram doesn’t require any nail art skills. These cherry cola, dark red nails are easy as pie to recreate and look right on trend.
Get the look:
- Prep nails with a base coat. Let dry.
- Paint all nails two coats of a dark red polish, like essie Nail Polish in Bordeaux. Let dry.
- Finish with top coat.
8. Mini red hearts
What’s not to love about these red heart nails by @lucyjanesbeauty on Instagram? They’re simple enough without being too busy and are sure to bring on the compliments.
Get the look:
- Start with a base coat. Let dry.
- Paint nails two coats of a pale pink polish, like Sally Hansen Insta-Dri Nail Polish in In a Blush. Let dry.
- Dip the ball end of a nail dotting tool into a red polish, like Salon Perfect Nail Polish in Salsa Dance, and use it to create 5-7 small hearts all around each nail; This doesn’t have to be in a perfect pattern. Let dry.
- Finish with top coat.
9. Neutrals with a pop of red
These nails by @sogelish on Instagram are the chicest minimalist option if you are not into bold designs. It’s subtle while still giving a pop of color, and will go beautifully with your neutral clothes and accessories.
Get the look:
- Paint nails with a base coat; Let dry.
- Paint two coats of a nude polish, like Sally Hansen Xtreme Wear Nail Polish in Bare it All on the index and middle finger nails. Then paint only half of the pinky nail nude. Let dry.
- On the ring finger nail, paint two coats of a red polish, like Salon Perfect Nail Polish in Salsa Dance and also paint the other half of the pinky nail with the red. On the pointer nail, use a striping brush like SQULIGT 3PCS Nail Art Liner Brushes to create a thin, vertical red line off-center. Let dry.
- Finish with top coat.
10. Deep red checkers
A deep, maroon red, like this design by @nailartbyqueenie on Instagram, is a gorgeous option for those who want to steer clear of a bright red.
Get the look:
- Prep nails with a base coat.
- Paint two coats of a deep maroon polish, like Olive & June Long-Lasting Polish in Obsessed, on the thumb, middle and pinky finger nails. Let dry.
- On the pointer and ring finger nails, paint two coats of a nude polish, like Sally Hansen Xtreme Wear Nail Polish in Bare it All. Let dry.
- On the pointer nail, use a nail striping brush, like SQULIGT 3PCS Nail Art Liner Brushes, dipped in the maroon polish to create one square in the upper corner and one square diagonal in the lower corner. Fill in the squares with the polish. Let dry.
- On the ring finger nail, use the striping brush and maroon polish to create four squares: one on the top middle, one on the bottom middle and one on each side of the nail. Fill in the squares. Let dry.
- Finish with top coat.
11. Dazzling diamonds
This design by @LifeWorldWomen on Youtube has your nails looking like jewerly.
Get the look:
- Prep nails with a base coat. Let dry.
- Cut a strip of tape into a narrow, long triangle. Stick onto center of nail with the point facing up.
- Paint over the nail with a red polish, like Salon Perfect Nail Polish in Salsa Dance.
- Peel the tape off to reveal the triangle of bare nail underneath. At the point of the triangle, add a dot of clear polish and place a rhinestone, like QEZEZA Rhinestones for Nails, on top. Let dry.
- Seal with top coat.
12. Retro reds
If you are looking for something similar to a classic red mani, but still want a little flair, this retro nail art by Maryam Maquillage on YouTube is just for you.
Get the look:
- Prep each with a base coat. Let dry.
- Paint two coats of a milky white polish, like Cirque Colors Sheers Nail Polish in Linen on all nails. Let dry.
- Use a red striping polish, like China Glaze Stripe Rite in Roll out the Red Carpet, to create a curved, semi-circle towards the bottom of the nail. Then, fill in all of the space above the circle all the way up to the tip of the nail. Let dry.
- Seal with top coat.
This post was originally published on this site be sure to check out more of their content.


