
We’re spending time gearing up for Easter by decorating eggs, so why not decorate our nails too?! And luckily, it’s easy to paint on a pretty and festive manicure in a few simple steps! Just take a scroll through the Easter nails options below. From fabulous florals to beautiful butterflies, playful bunnies and more there’s one for everyone. Plus, read on to see the steps it takes to recreate the looks at home (or use these photos for inspiration for your next in-salon manicure).
DIY Easter nails to try
All of these eye-catching manicures can be done with a few tools and in four steps or fewer.
1. Pretty pearl accents

“Pearls always make a feminine, classic statement,” says celebrity manicurist Patricia Yankee. “And that’s just what this pearly nail look does for your hands — it gives them a touch of elegance!”
Get the look:
- Paint all nails two coats of lavender polish, like essie Nail Polish in Lilacism. Let dry completely.
- On your ring and index nails, use a toothpick to apply two curved rows of flat-back nail pearls, such as BrainKer Half Flatback Pearls. Place the first row of pearls in a semicircle above your cuticle, then curve the second row of pearls above the first.
- Seal nails with clear top coat.
2. Easter nails: Bouquet of tulips

“Tulips are the quintessential spring flower!” says Yankee. “And because they tip the free edge of your nail, the flowers make your nails look longer.”
Get the look:
- Paint all nails two coats of petal pink polish, like essie Nail Polish in In The You-niverse. Let dry completely.
- On two accent nails per hand, create the tulips by using a lavender striper polish, like LeChat Cm Striping Nail Art in Lavender Flower, or a yellow striper polish, like Color Club Nail Art Striper in Yellow. Start at mid-nail and make three pointed bumps (or “petals”) and extend the color to the free edge. Let dry.
- Using a white striper polish, like Sally Hansen I Heart Nail Art Striper in White, outline the petals with a “Y” shape and upside down “V” shapes. Let dry.
- Seal nails with clear top coat.
3. Gilded Easter egg nails

“This gold leaf look is easy to create,” says Yankee. Bonus: You can also make matching Easter eggs.
Get the look:
- Paint all nails two coats of lavender polish, like essie Nail Polish in Lilacism. Let dry completely.
- On each nail, sweep on a nail adhesive, like Makartt Nail Foil Glue. Wait for the formula to turn from white to clear (it should feel tacky to the touch).
- Place a precut nail-sized strip of gold foil, like WFAUIBR Gold Leaf Flakes, (shiny side up) onto each nail. Use your fingertips to press each strip down, applying varying levels of pressure at different points around the nail bed. This ensures the foil leaves behind a speckled design. Seal nails with clear top coat.
4. Beautiful yellow blooms

“Tiny daises blooming on your nails are the perfect nod to spring,” says celebrity manicurist Miss Pop.
Get the look:
- Paint all nails two coats of bright pink polish, like OPI Nail Lacquer in Makeout-side. Let dry completely.
- On two accent nails per hand, create the daisies by dipping a toothpick into yellow polish, like OPI Nail Lacquer in Exotic Birds Do Not Tweet, and make two circles of five dots.
- Using a green striper polish, like LeChat Cm Striping Nail Art in Hot Green, make a “stem” under each flower that goes to the free edge.
- Dip a clean toothpick in clear polish and use to place circular orange rhinestones, like LolliBeads Round Nail Art Rhinestones in Fire Opal, at the center of each flower. Seal nails with top coat.
5. Bejeweled bunny accents

Each adorable bunny has a rhinestone bow that gives nails a touch of sparkle.
Get the look:
- Paint all nails two coats of pink polish, like Zoya Nail Lacquer in Yohanna. Let dry completely.
- On two accent nails per hand, create the bunnies by using white striper polish, like Sally Hansen I Heart Nail Art Striper in White, and paint a half circle. Then, make two long oval ears on each bunny. Let dry.
- Using a pink striper polish, like Sally Hansen I Heart Nail Art Striper in Hot Pink, paint the inside of the ears and add a dot for the nose. Let dry. Next, make the bunny’s eyes using black striper polish, like China Glaze Stripe Rite in Paint it Black. Let dry, then add a white dot at each center with the white striper polish; let dry.
- Dip a toothpick in clear top coat and use it to attach two pink triangle rhinestones, find them in a set like KADS Triangle Colorful Rhinestones, to make a bow on each bunny. Seal nails with clear top coat.
6. Easter nails: Blinged out butterflies

“Butterflies are a beautiful symbol of spring,” says Yankee. “And these sparkling ones bathe your hands in beautiful light!”
Get the look:
- Paint all nails two coats of hot pink nail polish, like Orly Nail Lacquer in That’s Hot. Let dry completely.
- On two accent nails per hand, create the butterflies by dipping a toothpick into clear top coat and use it to place two teardrop rhinestones, find them in a set like GA&EN Nail Art Rhinestones Set, (with the point facing inward) at the center of the nails. Underneath the teardrops, place two heart rhinestones from the same set.
- Using a white striper polish, like Sally Hansen I Heart Nail Art Striper in White, create antennae atop each butterfly. Then, use a toothpick dipped in clear top coat to place two circular rhinestones atop each antenna. Seal nails with clear top coat.
7. Chic with cherry blossoms

This time of year, cherry blossoms are in full bloom, so why not add their beauty to your fingertips!
- Paint all nails with two coats of pink polish, like CND Vinylux Nail Polish in Strawberry Smoothie. Let dry completely.
- Dip a toothpick in brown polish, like Sally Hansen Xtreme Wear Nail Color in Central Bark, and use it to paint branches onto two accent nails per hand. Let dry.
- Use white polish, like Sally Hansen Xtreme Wear Nail Color in White On, to dot three clusters on each branch. Then, dip a toothpick into clear polish and dot it on the back of small pink round rhinestones, find them in a set like Bajuqiju Nail Art Gems in Pink, and use to place in each cluster’s center. Seal nails with clear top coat.
8. Radiant rosebuds

“Nothing is more feminine than a blooming rose,” says Yankee. “And these sweet little rosebuds are actually very easy to make!”
Get the look:
- Paint all nails two coats of pale pink polish, like Sally Hansen Insta-Dri Nail Color in In a Blush. Let dry completely.
- On two accent nails per hand, use a bright pink striper polish, like Sally Hansen I Heart Nail Art Striper in Hot Pink, to make three to four large dots.
- Use a darker pink striper polish, like LeChat Cm Striping Nail Art in Light Purple, to make tiny “C”-shaped swirls within the pink dots. Let dry.
- Use a bright green striper polish, like LeChat Cm Striping Nail Art in Hot Green, to make small leaf shapes on the side of each rosebud. Let dry. Seal nails with clear top coat.
9. Wow-worthy wildflowers

A pretty wildflower-inspired manicure is sure to bring on the compliments.
Get the look:
- Paint all nails two coats of coral polish, like OPI Nail Lacquer in ElePhantastic Pink. Let dry completely.
- On two accent nails per hand, create flowers by using green striper polish, like FingerPaints Performance Art Striping Polish in Green, to make four long, thin stems and grass at different lengths. Top two stems with daisies made with tiny dots in yellow striper polish, like Sally Hansen I Heart Nail Art Striper in Yellow, and two tulips with orange striper polish, like Color Club Nail Art Striper in Neon Orange. Let dry.
- Use a toothpick and clear polish to add a small orange rhinestone, like LolliBeads Round Nail Art Rhinestones in Fire Opal, to the center of each daisy. Seal nails with clear top coat.
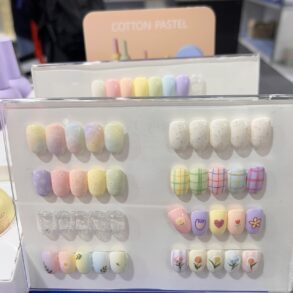
10. Easter nails: Peek-a-boo bunnies

Bunnies that “pop out” of the corners of nails add playful pizzazz to a pastel manicure.
Get the look:
- Paint nails two coats of a different color using purple, yellow, blue and pink polishes, find in a set like Beetles Pastel Nail Polish Set; let dry.
- At one corner of each nail, use a nail art brush, like Orly Short Detailer Brush, and white polish, like essie in Blanc, to draw a bunny head and ears; alternate the corners for each head for playful movement.
- Use the brush and hot pink polish, like Orly Nail Lacquer in That’s Hot, to fill in the ears, then dip in black polish, like wet n wild WildShine Nail Polish in Black Crème, to add eyes to each bunny. Seal nails with top coat.
11. Pop of color French tips

Swapping traditional white for pastel hues in yellow, purple and blue is a great way to give a French manicure some springtime flair.
Get the look:
- Apply two coats of pinky-nude polish, like Morgan Taylor in Prim-Rose and Proper, to all nails. Let dry completely.
- Place a French tip sticker, like Static Nails Round French Manicure Guides, on each nail, leaving the tip area exposed, then add a swipe of a pastel yellow, blue or purple polish, find in a set like Beetles Pastel Nail Polish Set, along one tip; add a second coat of the color if needed. Remove the sticker while the polish is still wet.
- Repeat on the rest of nails and alternate between the blue, purple and yellow polishes for the tip colors; let dry completely. Seal all nails with top coat.
12. Pretty pastel polka dots

A gradient polka dot Easter nails design makes a statement and creates the illusion of longer nails.
Get the look:
- Apply two coats of white polish, like essie in Blanc, to all nails; let dry.
- Use a dotting tool, like Le Mini Macaron Le Dottie Dotting Tool, and pastel blue polish, find in a set like Beetles Pastel Nail Polish Set, to create various-sized dots near the cuticle of each nail, leaving plenty of white space.
- Repeat with purple, pink and yellow polishes down the length of each nail; let dry completely. Seal all nails with top coat.
13. Darling daisy blooms

Like pop art for nails, these blooming white daisies complement any Easter attire.
Get the look:
- Paint all nails two coats of beige polish, like Olive & June in RP. Let dry completely.
- Dip a nail art brush, like Orly Short Detailer Brush, in white polish, like essie in Blanc, and create 2-3 daisy flowers on each nail. Once dry, use the brush and yellow polish, like Zoya in Pippa, to add a dot to the center of each flower.
- Use the brush and green polish, like ella+mila in Tropical Jungle, to draw leaves coming from each flower; let dry. Seal all nails with top coat.
This post was originally published on this site be sure to check out more of their content.