
It’s easy to look festive for the spooky holiday no matter if you’re wearing a costume or not by creating Halloween nails. With so many design options to choose from like spider webs to ghosts, bats and mummies — there’s sure to be one that will help you get you into the Halloween spirit. Best of all, you can whip up the nail art of your choice at home for pennies. Keep scrolling to see the dazzling designs that will “dress up” your fingertips and the simple steps it takes to achieve them.
19 DIY Halloween nail designs
1. Black cat Halloween nails
We all know the mascot of Halloween is a black cat. This black cat Halloween nail design is perfect if you want to stick to neutral; the black and white color way will go with just about any outfit.
Get the look:
- Paint the pinky and thumb nails with two coats of black polish, like Essie Nail Polish in Licorice. On the remaining nails, paint on a coat of clear base polish.
- On the ring fingernails, use a black nail art polish, like FingerPaints Striping Polish in Ch-Art-Coal, to paint on thick, crescent-shaped tips on the top of nails for the French tip.
- On the middle nails, use the black striping polish to draw a half oval on the top of nail and fill in to create the cat’s head. Then, draw two triangles for the ears.
- Use a white nail art polish, like FingerPaints Striping Polish in Hip Hip Hue-Ray, to paint on the eyes and nose of the cat, then black striping polish to create a dot inside of the each eye. Use the white striping polish again to then paint on “stars” and tiny dots on the rest of the nail.
- Repeat steps 3 and 4 for the pointer nails, but draw the cat on the lower corner of the nail.
- After letting all nails dry, seal all nails with top coat.
2. Bloody chic Halloween nails
Want some festive French tips for Halloween? Look no further than this easy-to-recreate mani. The red hue is very trendy for fall, and the dripping “blood” design will put you in the spooky spirit.
Get the look:
- Paint all nails two coats of a sheer nude-pink polish, like Olive & June Nail Polish in The Queen Takes Her Tea With Milk; Let dry.
- Use a red nail art polish, like FingerPaints Striping Polish in Red-Aissance, to paint on crescent-shaped tips for the French tips on the thumb, pointer and middle fingernails.
- On the ring and pinky fingernails, use the red striping polish to create a “dripping blood” design by painting thin lines with small circles on the ends.
- Seal all nails with top coat.
3. Pretty in pink Halloween nails
If you’re a pink nail fan through and through, don’t worry, you don’t have to give it up to still be festive — and this design proves it!
Get the look:
- Paint the ring fingernails two coats of a light pink polish, like OPI Nail Lacquer in Mod About You. On remaining nails, paint two coats of a darker pink polish, like Olive & June Nail Polish in Taffy. Let nails dry completely.
- On the middle fingernails, use a white nail art polish, like FingerPaints Striping Polish in Hip Hip Hue-Ray, to paint on a ghost, starting at the tip of the nail and stopping a little before the bottom of the nail on the left side. Fill in, and draw a narrow oval on the side of the ghost for the arm. Then, use a black nail art polish, like FingerPaints Striping Polish in Ch-Art-Coal, to paint the eyes and mouth of the ghost, and the light pink polish to create “blush” on the cheeks of the ghost.
- Repeat step 2 on the ring fingernails, but on the right side of the nails and starting at the bottom of the nail. Let dry.
- Seal all nails with top coat.
4. Ghosts, pumpkins and cobwebs, oh my!
Can’t decide on just one spooky nail design? Don’t fret — this Halloween manicure has a little bit of everything, but is still simple enough to not look overwhelming with too many elements.
Get the look:
- Paint all nails two coats of a sheer nude-pink polish, like OPI Nail Lacquer in Bubble Bath; Let dry.
- On the pointer fingernail, use a black nail art polish, like FingerPaints Striping Polish in Ch-Art-Coal, to create a spiderweb in the bottom corner of the nail; Draw four thin stripes all starting from the same corner point, stopping about halfway up the nail. Then, connect each stripe with three curved stripes.
- On the middle fingernail, use a white nail art polish, like FingerPaints Striping Polish in Hip Hip Hue-Ray, to paint on a small ghost from the upper corner of the nail. Create a small oval shape and fill in, then connect it with a tail. Use the black striping polish to draw eyes and a mouth.
- On the ring fingernail, use the black nail art polish to create a thin crescent shape on the bottom half of the nail to create a “moon.” Then, use a gold striper polish, like FingerPaints Striping Polish in Brushstroke of Brilliance, to paint three “stars” surrounding the moon.
- On the pinky fingernail, use an orange nail art polish, like LeChat Nail Art Lacquer in Hot Orange, to paint a pumpkin on the upper half of the nail. Use the black striping polish to create accent lines in the pumpkin, and the gold nail art polish to create the stem.
- Seal all nails with top coat.
5. Glittery orange pumpkin Halloween nails
Add a little sparkle to your day by incorporating it into your Halloween mani! This nail look is so fun for spooky season, and is easy to DIY.
Get the look:
- Start by painting the pinky and pointer fingernails two coats of orange polish, like China Glaze Nail Lacquer in Orange Knockout. On the middle fingernail, paint two coats of a sheer nude polish, like Olive & June Nail Polish in CCT. On the ring fingernail, paint two coats of a glittery orange polish, like ILNP Nail Polish in Trick or Treat.
- On the middle fingernail, use a nail art brush, like Kiara Sky Nail Art Brush, and the orange polish to create three pumpkins. Paint on four thick, curved stripes close to each other to create the pumpkin shape. Paint the stem with the nail art brush and a green polish, like OPI Nail Lacquer in Pricele$$.
- Seal all nails with top coat.
6. Halloween French tips
French tips never go out of style, and you can make them festive for just about any season — including Halloween.
Get the look:
- Paint all nails two coats of a sheer nude-pink polish, like Olive & June Nail Polish in CCT; Let dry.
- Use a nail art brush like Kiara Sky Nail Art Brush and a light orange nail polish, like Sally Hansen Xtreme Wear Nail Color in City That Never Peach, to paint the base of the pumpkin at the tip of nails. You can draw this by thinking of the top half of a heart.
- Use the nail art brush and a darker orange polish, like China Glaze Nail Lacquer in Orange Knockout, to create accent lines in the pumpkins and outline the pumpkin shapes.
- Use the nail art brush and green polish, like Essie Nail Polish in Off Tropic, to draw the stems of the pumpkins. Let dry.
- Seal all nails with top coat.
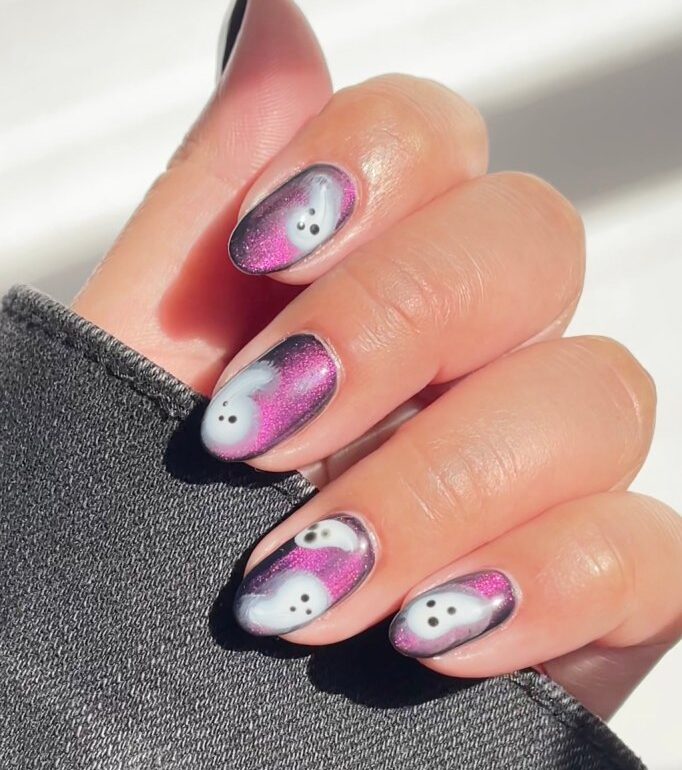
7. Shimmery purple and ghosts
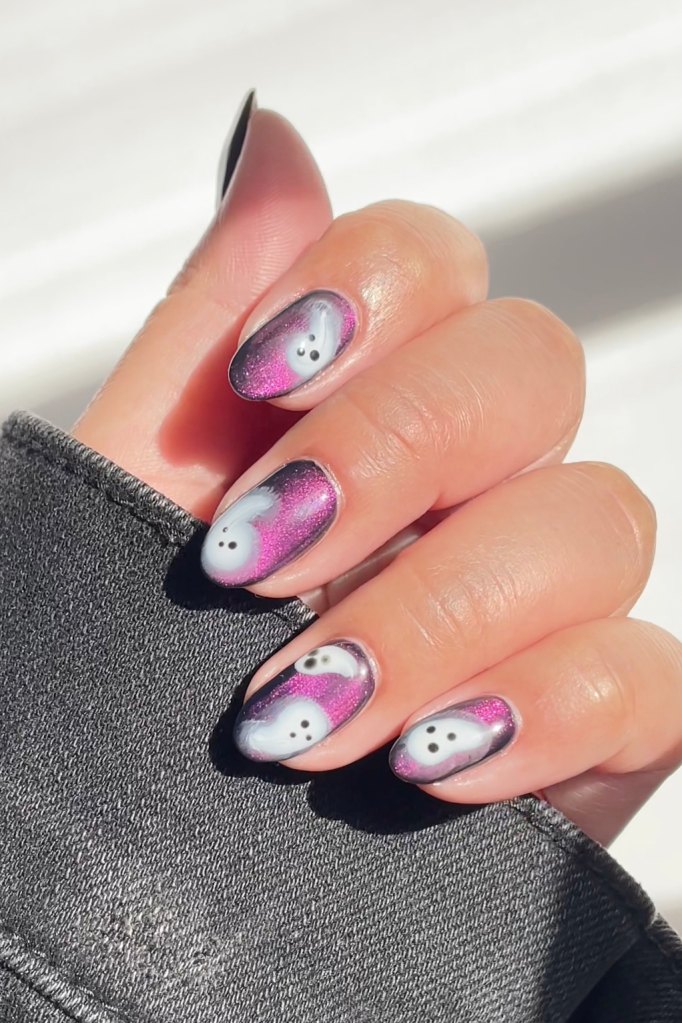
Professional nail artist Sigourney Nunez created this gorgeous, purple, gel Halloween nail design, and shared the exact step-by-steps to DIY this gel mani.
Get the look:
- Apply two coats of Red Carpet Manicure Polish in Black Stretch Limo. Then, apply Red Carpet Manicure Polish in I Need Space, and use a magnet to create the cat eye effect; Cure.
- Apply a layer of Red Carpet Manicure Polish in Blooming Gel, and use a dotting tool to apply Red Carpet Manicure Polish in Iconic Beauty in the shape of ghosts and watch the gel expand. Cure once desired effect is reached.
- Add dots to create the eyes and mouth.
- Finish with a glossy layer of gel top coat on all nails and cure.
8. Sparkly spiderwebs
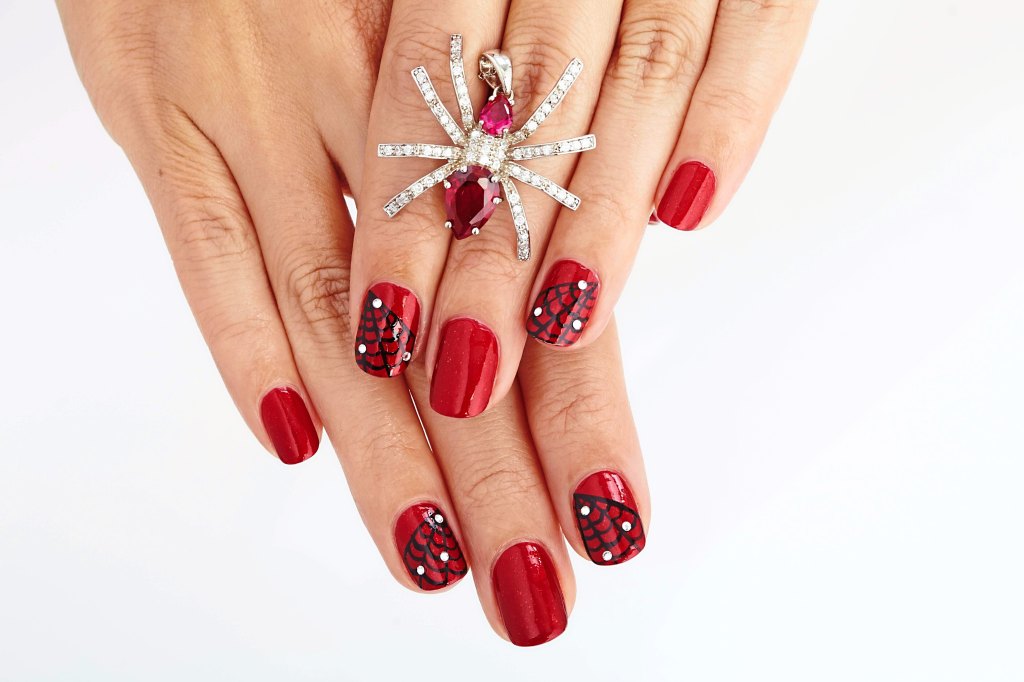
“The bold red polish highlights the pretty shape of your nails,” says celebrity manicurist Miss Pop. “And the shimmery spider web creates a classic Halloween scene!”
Get the look:
- Apply two coats of shimmery red polish, like Morgan Taylor Nail Lacquer in Best Dressed to all nails; let dry completely.
- Using a black nail art polish, like FingerPaints Striping Polish in Ch-Art-Coal, draw a diagonal web on both the index and ring fingernails; let dry.
- Dip a toothpick into clear top coat and use it to place 3 small nail art rhinestones, like Beadsland Rhinestones, on each web. Seal all nails with top coat.
9. Playful polka dots + ghosts Halloween nails
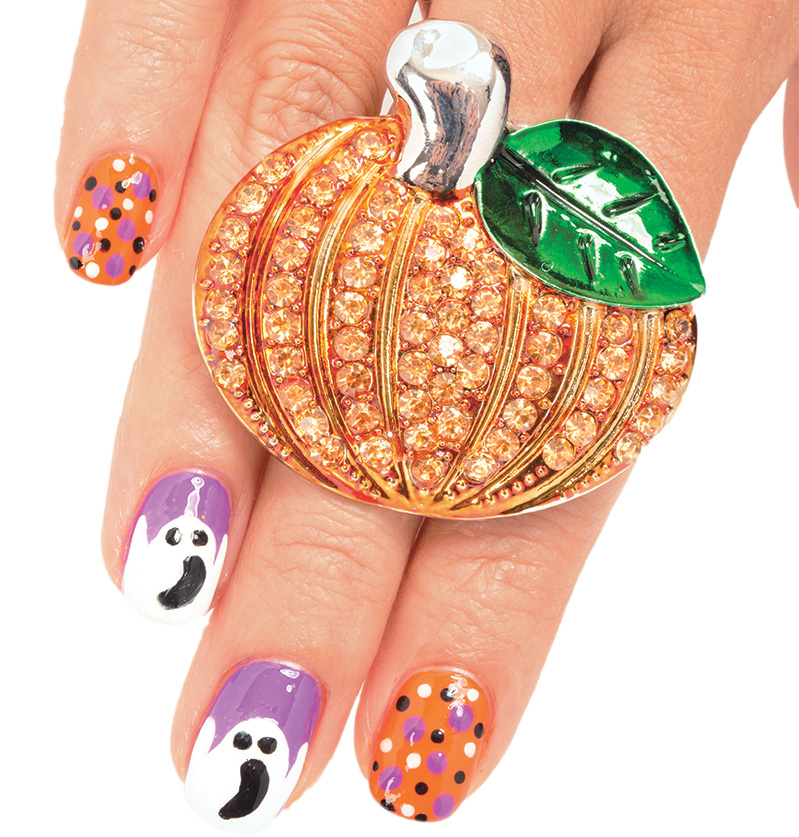
One of the easiest DIY nail designs you can master? Colorful polka dots! And creating a mix-and-match manicure by pairing dots with ghoulish accents up the Halloween fun.
Get the look:
- Paint two coats of an orange polish, like Sally Hansen Hard as Nails Xtreme Wear Nail Color in Sun Kissed, on the pointer and pinky nails. On the rest of nails, apply two coats of purple polish, like China Glaze Nail Lacquer in Stop Beachfrontin’; let dry completely.
- Dip various-sized dotting tools, find them in a set like China Nail Creations Dotting Marbleizing Tool Kit, into purple polish, white polish, like Sally Hansen Xtreme Wear Nail Polish in White On, and black polish, like China Glaze Nail Lacquer in Liquid Leather, and create multiple dots on nails; let dry.
- On the purple nails, draw the silhouette of a ghost along the tip of the nail using the white polish; fill in and let dry. Then, dip a medium-sized dotting tool into black polish and use to create the eyes for each ghost, then outline the mouth of each ghost and fill in; let dry. Seal all nails with top coat.
10. Whimsical witch hat
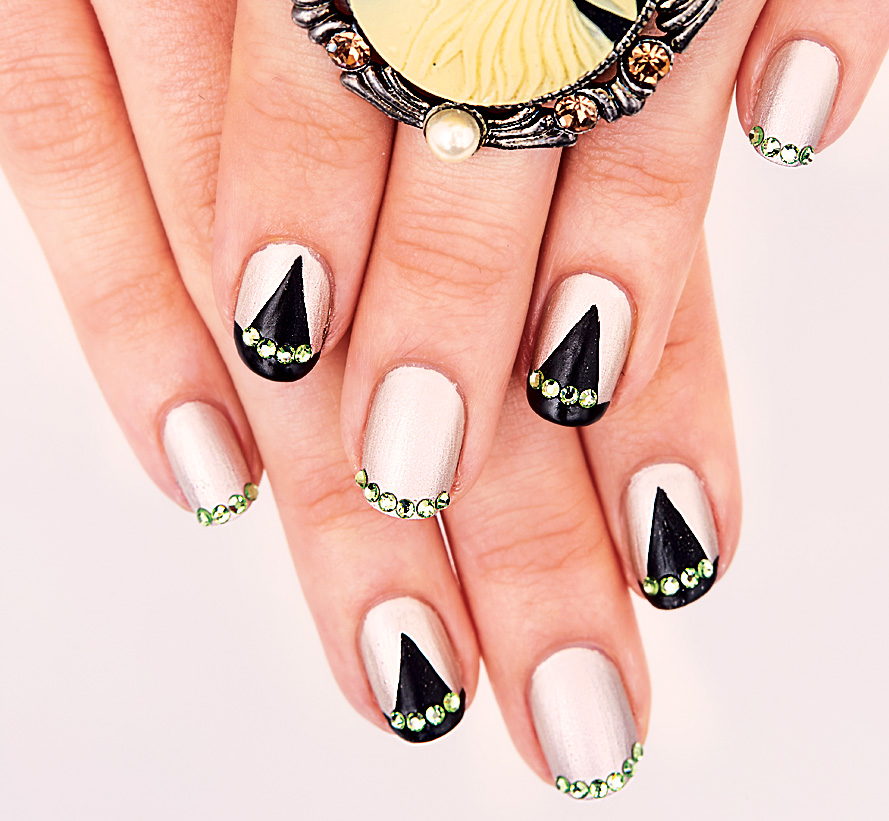
There’s no witchcraft needed to create this fun manicure.
Get the look:
- Paint two coats of metallic silver nail polish, like OPI Nail Lacquer in Chrome Clawz, on all nails; let dry completely.
- On two accent nails per hand, make the peaked witch hat with a black nail art polish like FingerPaints Striping Polish in Ch-Art-Coal, by drawing a horizontal line along the free edge and a large triangle above it; let dry.
- With a toothpick and dots of clear nail polish, add a row of lime green rhinestones, like LolliBeads Resin Crystal Round Nail Art along the brim of the hat.
- On the nails without the witch hat. Use the toothpick and top coat to place a row of the green rhinestones along the free edge of nails to create bejeweled French tips. Seal all nails with top coat.
11. Chic bat Halloween nails
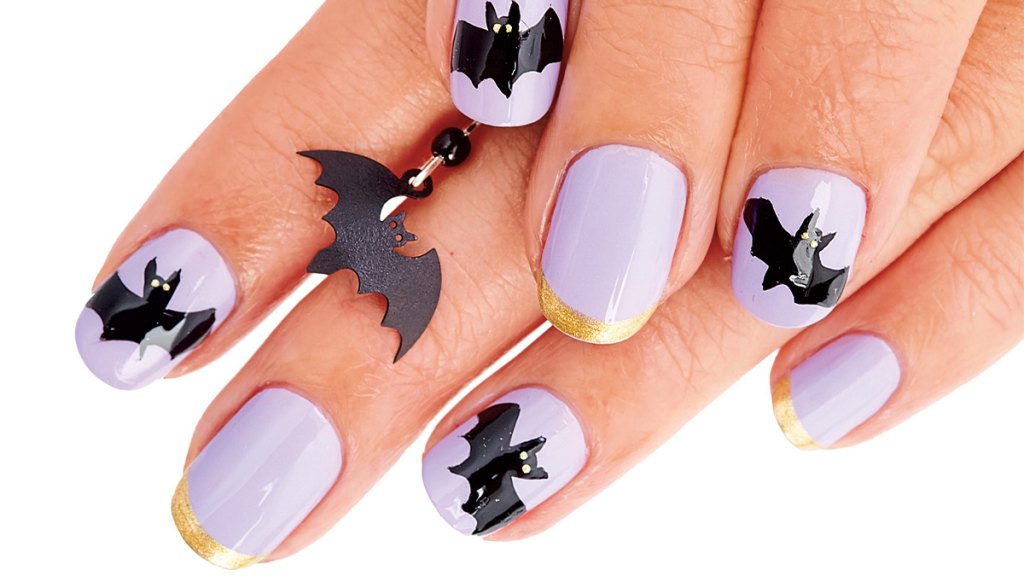
Take nails to gorgeous new heights with this soaring bats and gilded French tips design. “The classic French tip instantly elongates your nail, and the gold and lavender color scheme gives it a regal touch!” says Miss Pop.
Get the look:
- Paint two coats of a lavender polish, like Sally Hansen Insta-Dri Nail Polish in Heather Hustle, on all nails; let dry completely.
- Use a black striper polish, like FingerPaints Striping Polish in Ch-Art-Coal, to draw the outline of a bat on two accent nails per hand. Fill in with the black polish; let dry.
- Swipe a metallic gold striper polish, like China Glaze Stripe Rite Brush in Stroke of Luck, across the tips of each bat-free nail, then use it to dot eyes on each bat; let dry. Seal all nails with top coat.
12. Striking googly eyes Halloween nails
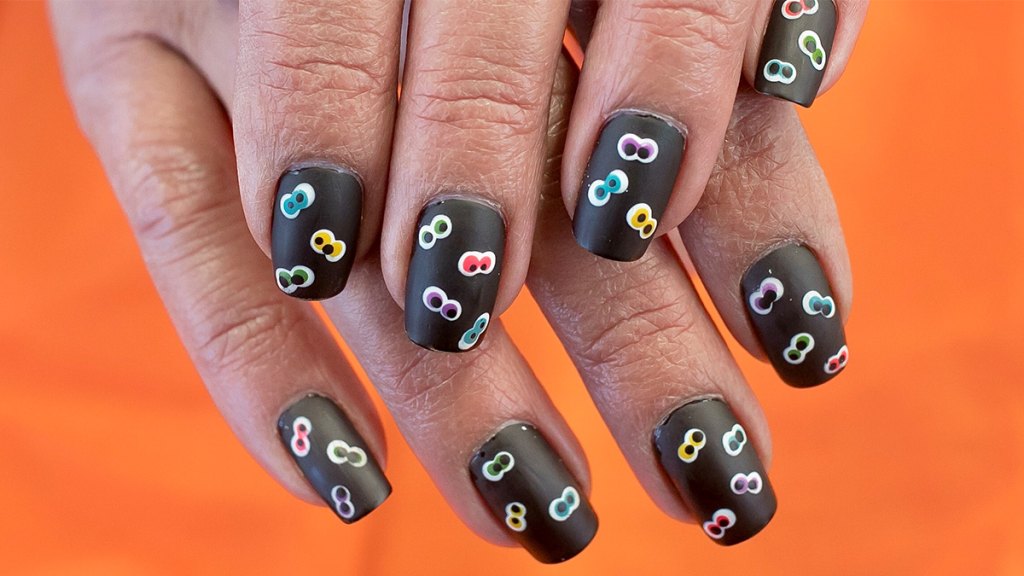
Make a fun statement with this googly eye design that looks extra spooky when created on a black backdrop.
Get the look:
- Paint two coats of black polish, like Sally Hansen Xtreme Wear Nail Polish in Black Out, on all nails; let dry completely.
- Use a dotting tool, like Cina Nail Creations Dotting Marbleizing Tool Kit, and white nail polish, like Sally Hansen Xtreme Wear Nail Polish in White On, to create three to four pairs of small dots on each nail; let dry. Then, create smaller pairs of dots with the whites of each pair of eyes using the dotting tool along with red polish, like Sally Hansen Insta-Dri Nail Polish in That’s a Blazing, yellow polish, like Sally Hansen Insta-Dri Nail Polish in My Ca-Banana, purple polish, like Sally Hansen Insta-Dri Nail Color in Va Va Violet, green polish, like Revlon Super Lustrous Nail Enamel in Posh, and blue polish, like L.A. COLORS Color Craze Nail Polish in Aquatic.
- Once the colorful “irises” are dry, add pairs of smaller dots for the pupils with the dotting tool and black polish; let dry. Seal all nails with a matte top coat, like Wet n Wild Nail Polish in Wild Shine.
13. Festive pumpkins and bows
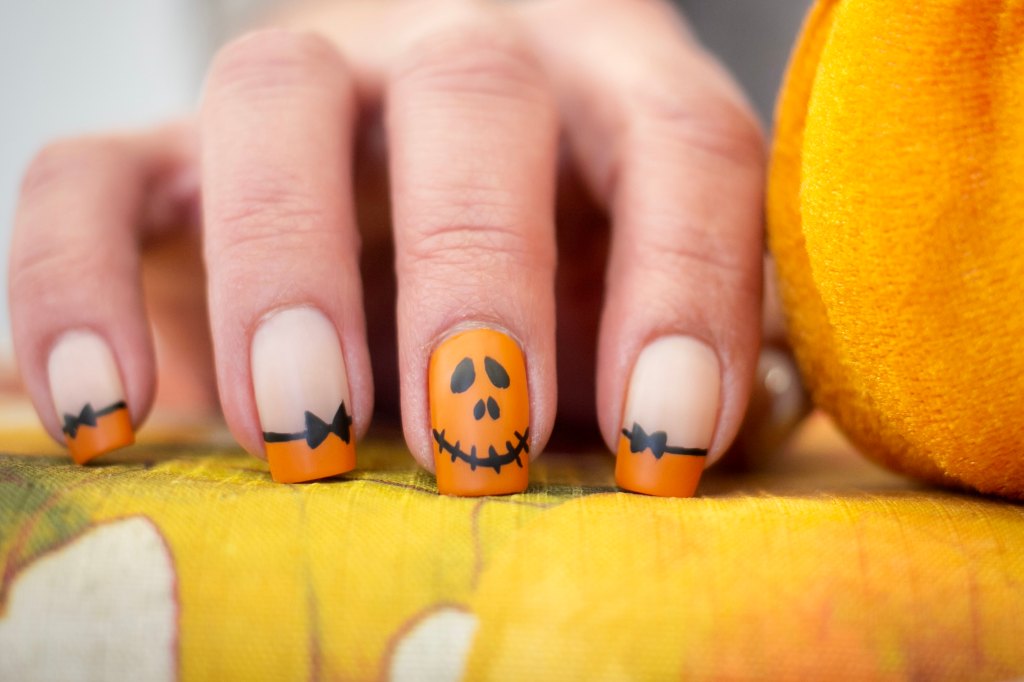
A Jack-o’-Lantern design is a classic Halloween nails look and is incredibly easy to create. What’s more, bow-accented French tips give the look some feminine flair.
Get the look:
- On the middle fingernail of each hand, paint two coats of an orange polish, like Sally Hansen Hard as Nails Xtreme Wear Nail Color in Sun Kissed; let dry completely. On the remaining nails, paint two coats of a nude polish, like Nina Ultra Pro Nail Laquer in Tea Party; let dry.
- On the orange nails, use a black striper polish, like FingerPaints Striping Polish in Ch-Art-Coal, and draw two oval eyes toward the bottom of the nail. Then, draw two smaller ovals underneath for the nostrils. Next, draw a thin, curved line for the mouth and short, stitch-like vertical lines going along the curved line; let dry.
- On the nude nails, use the orange polish to create thick French tips; let dry. Under each orange tip, use the black striper polish to draw a thin stripe. Then, paint two small triangles with the points facing each other to create the bows; let dry. Seal all nails with a matte top coat, like Wet n Wild Nail Polish in Wild Shine.
14. Pretty patchwork
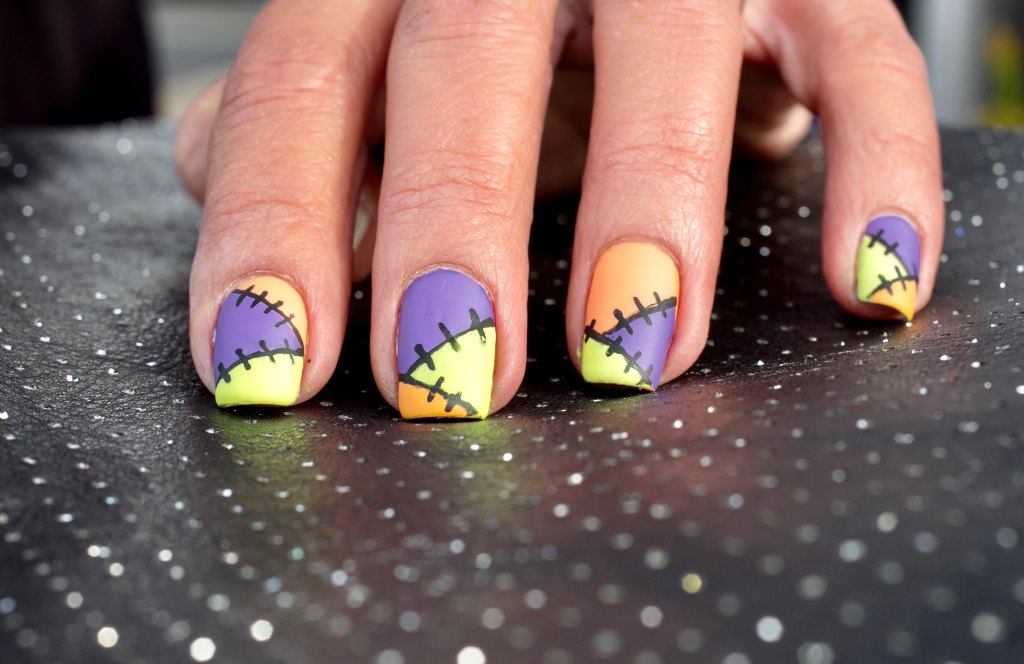
This Frankenstein-inspired patchwork design couldn’t be easier to create and adds playful and colorful pizzazz to fingertips.
Get the look:
- Paint three diagonal blocks of color on each nail using purple polish like Sally Hansen Insta-Dri Nail Color in Va Va Violet, lime green polish like OPI Nail Lacquer in Summer Monday-Fridays, and orange polish like OPI Nail Lacquer in Silicon Valley Girl; let dry completely.
- Using a black striper polish, like FingerPaints Striping Polish in Ch-Art-Coal, draw thin stripes to outline where each color meets. Then, paint on three to four short vertical lines along each stripe to create “stitches;” let dry.
- Seal all nails with top coat.
15. Modern Halloween nails
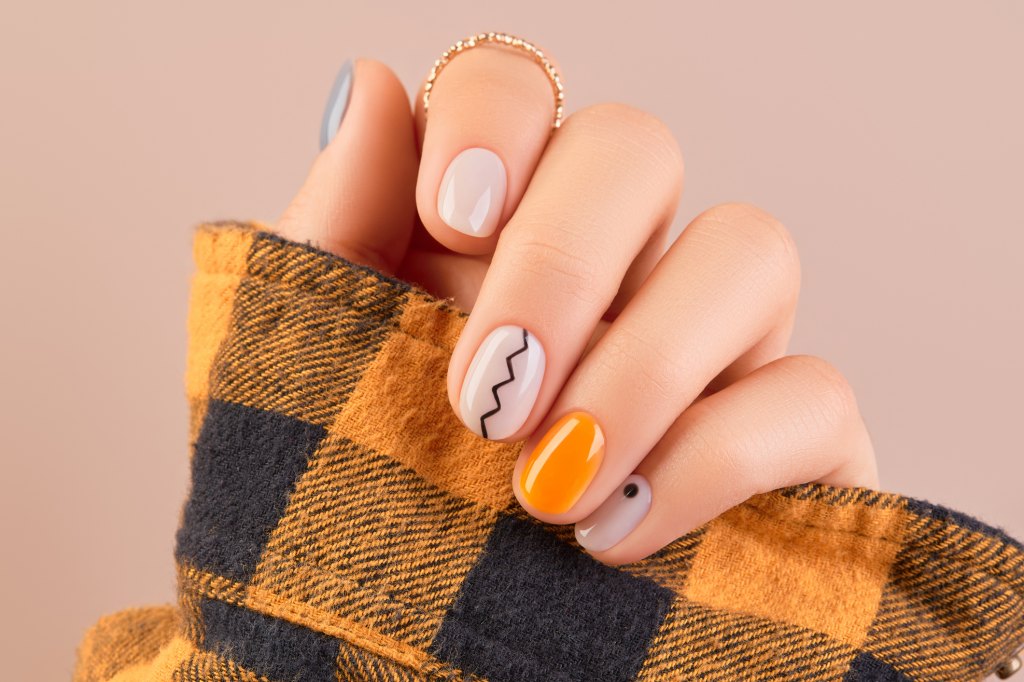
For a modern and minimalist manicure, which are trending this year, try this subtle Halloween-esque manicure that’s equally as stunning as more intricate designs. Bonus: It works well for short nails since you don’t need a wide or long nail bed for the simple nail art. (Click through to see more trendy nail designs of 2023.)
Get the look:
- On the ring fingernail of each hand, paint two coats of an orange polish, like Sally Hansen Hard as Nails Xtreme Wear Nail Color in Sun Kissed. On the thumb nail of each hand, paint two coats of a grey polish, like Sally Hansen Complete Salon Manicure Nail Color in Grey-Dreaming. And on the remaining nails, paint two coats of sheer, milky white polish, like Aieenjor Nail Polish in Milk-White. Let all nails dry completely.
- On the middle fingernails, use a black striper polish, like FingerPaints Striping Polish in Ch-Art-Coal, to create a thin, zig-zag line vertically down the center of the nails.
- On the pinky nail of each hand, use a dotting tool, like Cina Nail Creations Dotting Marbleizing Tool Kit, and black polish to create a small dot on the bottom middle of the nail; let dry. Seal all nails with top coat.
16. Simple black and orange color block
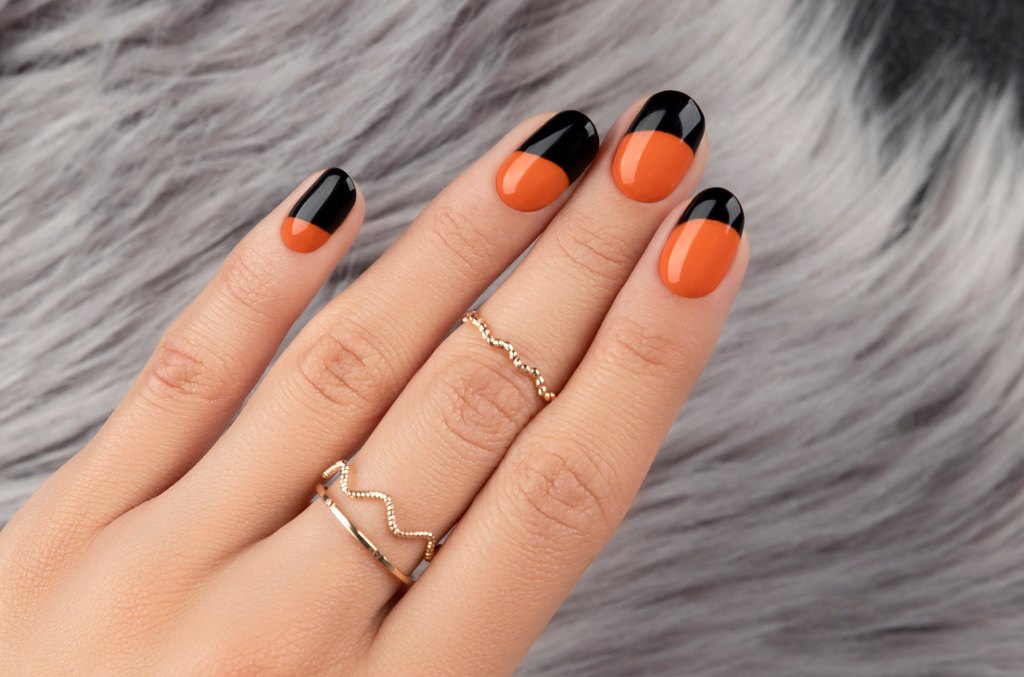
This black and orange Halloween nails look is perfect for beginners! That’s because it doesn’t require any special tools, and it doesn’t have to be perfect either.
- Apply two coats of an orange polish, like Essie Nail Polish in To DIY For, on all nails; let dry.
- Using a black nail polish, like Sally Hansen Xtreme Wear Nail Polish in Black Out, create curved blocks of black from the tip of the nail, gradually getting thicker with each nail; let dry. Seal all nails with top coat.
17. Spooky ghosts and mummies Halloween nails
This design from @nailsbyliana_ on Instagram combines two classic Halloween costumes, ghouls and mummies, into one playful manicure.
Get the look:
- Paint two coats of a sheer nude polish, like Cirque Colors Nail Polish in Organza, on all nails; let dry completely.
- On the pointer and pinky fingernails on each hand, use a white striper polish, like FingerPaints Striping Polish in Hip Hip Hue-Ray to paint on ghost silhouettes. On the ring fingernail, create a mummy design by painting thin criss-crossing and diagonal stripes using the white striping polish; let dry. Next, use a black striper polish, like FingerPaints Striping Polish in Ch-Art-Coal, to add small dots for the eyes of the mummy on the ring fingernails and the ghosts on the pointer and pinky fingernails; let dry.
- On the middle fingernails, create “stitches” on opposite top and bottom corners of the nail with the white striper polish by drawing a curved horizontal stripe and three smaller, vertical stripes going along it; let dry. Seal all nails with top coat.
18. Eye-catching starry French tips
A Halloween twist on a French manicure like the above look by @RiceKittyNails on Instagram makes nails a gorgeous focal point. (Click through to see more French tip nail designs.)
Get the look:
- Apply two coats of a sheer light pink polish, like Sally Hansen Color Therapy in Sheer Nirvana, to all nails; let dry.
- Use an orange striper polish, like Sally Hansen I Heart Nail Art Striper in Orange, to create a scallop design along the free edge of two nails per hand. Repeat on remaining nails with a black striper polish, like FingerPaints Striping Polish in Ch-Art-Coal; let dry.
- Use the black striper polish on the orange nail tips to create various tiny pointed star shapes and dots; repeat using a white striper polish, like FingerPaints Striping Polish in Hip Hip Hue-Ray, on the black nail tips; let dry. Seal nails with top coat.
19. Bold orange and black ombre
An eye-catching black and orange ombre design like the above by @KelliMarissa on YouTube stuns on all nail lengths, especially short nails since no “art” or drawing is involved. (Click through to see more Halloween nail designs.)
Get the look:
- Paint two coats of an orange polish, like Sally Hansen Hard as Nails Xtreme Wear Nail Color in Sun Kissed, on all nails; let dry completely.
- Take a makeup sponge and paint three stripes of polish: orange, a darker orange, like OPI Nail Polish in It’s a Piazza Cake, and black, like Wet n Wild Wild Shine Nail Polish in Black Crème. Then, press onto nail to stamp on the ombre design. Repeat on all nails; let dry. Seal all nails with top coat.
This post was originally published on this site be sure to check out more of their content.