Following is a transcript of an interview with Julia Osugi conducted by Rina Muguruma, author of ICU Her Campus.
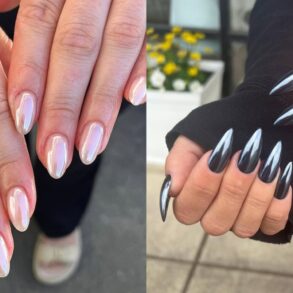
Meet Julia Osugi, a dear friend with an incredible talent for nail art designs. I had the pleasure of interviewing Julia about her self-taught experience and creative process, and I am excited to share her insights with those looking to start on their journey to designing their nails.
—Could you tell us about your journey into nail art? What initially sparked your interest, and how did you develop your unique style?
I have always wanted to get my nails done, but I decided to do them on my own because it’s costly at a salon. So, I began buying the items from affordable outlets like 百均 (Hya-kin; 100 Yen stores). I began working on my nails around 2017, initially just painting them regularly. It wasn’t until 2018 that I started using gel nails and experimenting with different designs. It became a way to overcome my insecurities about my hands and spend quality time with myself. Over time, I’ve learned new techniques and developed my style despite some initial struggles, like biting my nails.
—I see that doing nail art is more than just a beauty routine for you. I would love to hear more. Could you walk us through the process of getting your nails done? What materials do you use, and how long does it typically take you?
Sure! Oh, the materials. It’s a whole checklist—base coats, top coats, colors, tips, builder gel, files; you name it. I lean towards gel polishes because they’re more durable, especially for my weak nails. I usually start my nail art by cleaning up the cuticles, pushing them back, and cutting off any excess. Then, I buff the natural nail to make it a bit rough, letting the polish sit better. I use gel polishes because they last longer, especially with my weak nails.
For attaching the tips, I’ve shifted from using nail glue to a base coat gel with a slip layer technique. I have also started using more of something called builder gel, made for building strength and, if you’d like, length. The process, including prep, painting, and curing, takes 2-3 hours for one hand.
—How do you remove them, and what is your aftercare routine?
Before having an electronic file, when I remove the nail art I have on, I wait until one nail starts to pop off naturally, and then I soak my nails in the shower to soften them. Using a combination of oil, particularly jojoba oil, and an orange stick, I carefully remove the nails without damaging the nail bed. I avoid forcefully prying them off to prevent any harm done to them.
After removing them, I moisturize my nails with the same jojoba oil. But after you lovelies [Julia’s friends] gifted me my electronic file, I now file them off or soak them off with acetone, especially because some products are made to be soaked off while others can only be filed down.
— I’m happy to hear that you like our gift! Now, this is something I have always wondered about your designs. Where do you draw inspiration from, and do you have any go-to sources or artists you follow?
My inspiration mainly comes from Pinterest and Instagram. I’ve curated my Instagram feed to be filled with nail art content. I save designs I feel confident about recreating or ones I aspire to try. It’s a mix of personal creativity and getting ideas from the talented nail artists in the online community.
—Thank you so much for sharing your insights. Finally, do you have any advice for those who want to start on their nail art journey, especially for beginners?
If you’re just starting out, I recommend getting materials from affordable stores, like the 100 yen store. Invest in a good UV light because it’s crucial for effectively curing gel polishes. Experiment with different types of gel polishes, like clay gel for molding shapes or magnetic gel for unique effects.
And don’t rush the process – take your time to decide on designs and practice patience, especially when doing your non-dominant hand. It’s a journey, and the more you do it, the more you’ll refine your skills.
This post was originally published on this site be sure to check out more of their content.


