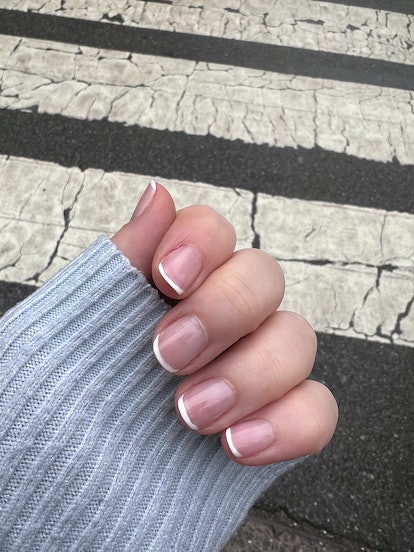
Many of 2024’s biggest nail trends are defined by one overriding theme: minimalism. Particularly, you’re about to see a lot of “old money” manicures.
In short, this nail style is classic, simple, and seriously subdued, with sheer pink and neutral nail polish shades a few of the typical go-tos. The quietly luxurious vibe is also often associated with natural short nails, as well as timeless designs like ultra-crisp micro French tips.
Kendall Jenner, for one, has officially claimed the micro French tip look as her signature mani in recent months, pairing the nostalgia-filled art with short, square-shaped nails that have soft, rounded edges. Personally, I’m obsessed with the aesthetic — but I much prefer to skip the salon and paint my nails at home.
That’s where the $5 Lights Lacquer French nail tool comes in. You may have seen it on your FYP: It’s been going viral for its easy-to-use nature and low price point. And so, in the name of journalism (and curiosity), I had to try it.
Fast Facts
- Price: $5
- Best for: DIY manicurists who love the look of classic French nails but may not have the skillset to free-hand the tips.
- Rating: 4/5
- What I Love: Once you get the hang of it, the result is an ultra-trendy manicure that looks professional and chic.
- What I Don’t Love: I found that the thinner French tip chipped sooner than my nails typically do.
The Nail Art Stamper Tool
The Lights Lacquer Nail Art Stamper Tool is equipped with a soft, rounded silicone end that allows at-home nail painters to try manicure trends with ease. Along with French tips and micro Frenchies, the tool also makes marble designs a cinch.
How To Use It
Tutorials on NailTok tend to make all sorts of designs look effortless to recreate — but this tool in particular gave me high hopes, because, in essence, all it requires is a stamp (hence the name).
- Lightly buff the rounded silicone with a low-grit nail file and wipe away the residue.
- Apply a thin swatch of nail polish directly onto the silicone, painting a clean line in one direction.
- Place your nail’s tip at the edge of the polish swatch, pressing into the silicone at about a 45-degree angle.
- Repeat on each nail until you’re done.
- When your nails are dry, use the scraper to remove residue left on the silicone.
First Impression & Results
Upon my first use, I realized that there was a bit more of a learning curve than expected.
Pro tip: Before applying your French tips with the tool, make sure that your polished base is completely dry to avoid a sticky mess. Secondly, when applying your paint swatch, I found that the polish dried rather quickly on the silicone — because of that, I worked on two to three nails at a time before clearing the swatch and starting fresh.
My last bit of advice is to press your nail not only at the correct angle, but at the bottom of the swatch’s edge. This prevents any polish from getting on your skin or beneath the nail, keeping your tips looking clean and crisp.
At first glance, the micro French tips appear nearly perfect and professionally done, though a closer inspection would reveal a few minor imperfections. TBH, I received so many compliments on my nails that it hardly mattered (and no one is looking that close at my nails, anyway).
The Verdict
Despite the learning curve, I was overall pleasantly surprised by the results. As someone who is pretty good at painting my own nails, I draw the line at French tips — though this hack made it easy, especially with practice.
My first mani from the tool had me obsessed with the results. Though I did experience a bit of premature chipping (and the lines weren’t entirely pristine and perfect), I’d say the stamper is very much worth a try.
This post was originally published on this site be sure to check out more of their content.


