DIY at-home manicures require basic nail buffing and clipping tools, nail paints of one’s choice, and a top coat to seal all the hard work. Salon manicures are fancy and nice, but as it is also hefty on the pocket, one cannot afford or avail of salon appointments whenever it’s time for a nail change.
While you require a little trial and error when attempting gel manicures and detailed nail art at home, simple nails such as the classic French, Korean, and Press-on nail manicures can be achieved at home.
It is not impossible to get Instagram-worthy nails by yourself if you paint them like a pro with tips from celebrity manicurists and some practice.
Step-by-step DIY at-home manicure for nail enthusiasts
DIY at-home manicures are more about having fun and learning than perfection. They can be created with simple tools and references.
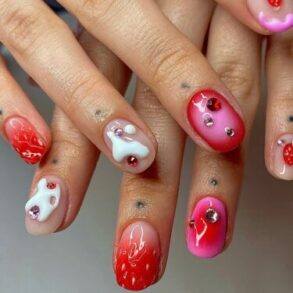
1) Prep the nails:
If you already have nail polish on, the manicure should begin with a good nail polish remover, Sally Hansen Strengthening Polish Remover ($5.95), which takes off all the polish and helps strengthen the nails and moisturize the cuticles.
Even if you don’t have nail polish on, running a cotton ball with remover on each nail is better to get rid of any residual dirt and oils.
Prep the cuticles with a remover to soften the area and dissolve dead skin. Avoid cutting the cuticles as they protect the nails from bacteria.
2) Clip, file, and buff the nails:
Clip the nails first if they’re not the desired length. Then file gently moving it in a single direction to get the nail tops round, square, or a fancy ballerina shape.
For people with thin nails, celebrity manicurist Deborah Lippmann suggests that the filer be used by tilting it so the nails can be filed from underneath, which allows you to see what you are doing and protects them from overfilling.
Buffing the nails creates a smooth surface for application. If buffing is skipped, the natural oils in the nails can build up, leaving residue from previous manicures on them. Buffing the nails is like brushing the teeth. It is essential for brightening and getting rid of nail ridges.
3) Apply a base coat:
Base coat application hydrates and protects the nails. It prevents chipping as well. Ensure one waits two full minutes between each coat when starting with the base coat. You can try the Essie Here to Stay ($11), a base coat infused with color-adhesive technology that holds color to the nails while offering a barrier to prevent nail staining.
4) Apply the first coat of color:
Now comes the fun part of a DIY at-home manicure: painting the nails! Paint the nails with a coat of the nail polish of choice, and make sure to get the brush all the way down to the cuticle.
Maximum nail coverage on the first coat makes second coat application easy. The common mistake most people make is to overload the brush and overdo the strokes. So, the key is to load just enough nail polish on the brush and cover the nail in a single coat.
To ace the first coat, you can try a nail polish handle like Olive and June’s ‘The Poppy’ ($16). Its patented universal nail polish bottle handle makes the application strokes sturdier and faster.
5) Apply the second coat of color:
After taking a break for two to three full minutes, apply the second coat of nail polish. Most pastel and sheer shades require a third coat for seamless coverage. However, make sure that the second coat is kept thin and lovely.
You can also try press-on nails if you are short on time. A topcoat protects the manicure from chipping and adds shine to the manicure.
It is important to know that skipping top coat application means reduces the lifespan of the at-home manicure.
6) Clean up the rough edges and let the nails dry:
The perfect DIY at-home manicure requires tidying up wobbly edges and mistakes by wrapping a cotton ball soaked in nail polish remover around the end of the cuticle stick.
Trace around the nails and then let the nails dry for five minutes.
With the abovementioned easy-to-follow steps and simple manicure tools, one can ace DIY at-home manicures and recreate any trending nail art with ease after consistent practice.